How to make a shield in Minecraft?
Learn how to make a shield in Minecraft and protect yourself better in survival mode. Shields are easy to craft in Minecraft and useful when you need to defend yourself. They can mean the difference between dying in a mine or coming home with all your diamonds.
In an adverse universe, knowing how to make a shield in Minecraft can be the difference between another day breaking blocks and building objects freely or suffering from zombies and other monsters that appear to hinder the player’s progress. Creating a shield is divided into a few steps, as it is not a basic object in the game, but it is quite simple to obtain it. Check it out below and good luck in your explorations.
How to make a shield in Minecraft?
For creating a shield, you will need six boards of any type and one iron bar. Iron Bars can be obtained by breaking Iron Blocks, normally found in caves or caves, but the player must use a pickaxe to break the block, otherwise no material is obtained.
Do you have everything you need? Access the Workbench, one of the first created with four wooden planks, and follow the steps below:
- Open the creation menu with the shortcut “E” on your computer or, if you are on your cell phone, the three dots next to the items;
- Drag the items from your inventory and position them as in the image below;
- Now just drag the shield to your items to equip it.
With a shield in Minecraft, you can face the game’s enemies, including the dangerous Creepers, as the impact of the explosion is absorbed and the distance you are thrown back also decreases, by one block. There is also the possibility of strengthening your shield through enchantments.
How to enchant the shield?
Three shield enchantments are available in the game. They are Curse of Disappearance, Patch, and Durability. The first is useful if you are playing on a server with other players and want to prevent them from using your items if you end up dying.
Mending and Durability Enchantments are useful in all scenarios, increasing resistance and automatically repairing the item, but it is not possible to use both on the same object. For any enchantment, you need an Enchantment Book, found in chests in Fortresses or Libraries, in Commerce or fishing, entering the “Treasure” category, and an Anvil.
Creating an anvil
- Right-click if you are on the computer, or tap on the Workbench if you are on your cell phone;
- Have three Iron Blocks and four Iron Bars in your inventory;
- Position them as in the image below;
- Click and drag the item to your inventory to finish.
Enchant the shield in Minecraft
- With the anvil positioned on the map, access it in the same way you did with the Workbench;
- Place the Shield in the first space and the Book of Enchantment you want in the second;
- Name, if desired, and drag the shield into your inventory.
Ready! This way you can create a shield to strengthen yourself against the enemies you will encounter throughout the game.
What do shields do?
Shields will protect you from the following attacks:
- Melee attacks
- Normal and inclined arrows
- Flaming Arrows
- Tridents
- Guardian Lasers
- Pufferfish spines
- Fireballs
- Virginia creeper explosions
- Horrible fireball explosions
How to customize the Shield in Minecraft?
You can customize a Shield in two ways, just changing its color or applying textures and decorations.
How to paint the Shield?
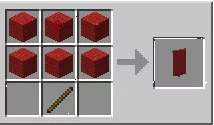
It is possible to change the color of your Shield by combining it with a Standard (also called flag or banner) of the desired color. To make Banners you need 6 Wool and 1 Stick. When you get them, organize them like this:
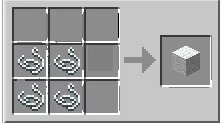
Wool is mainly obtained from sheep. You can kill them or just shave them with Scissors. Another way to obtain Wool is by crafting them with 4 Lines as follows:
The main ways to obtain Line is by killing Spiders or destroying Webs. To change the color of the wool, use a Dye of the desired color. Once you have your Shield and your Banner, combine them as follows:
Once done, your Shield will take on the color of the Banner used.
How to apply textures and decorations to the Shield in Minecraft?
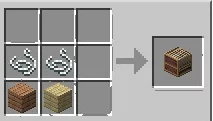
In addition to changing the color of the Shield, it is possible to decorate it in another, slightly more advanced way. To do this, you will need to craft a Loom. You will need 2 Lines and 2 Boards of any type organized like this:
After crafting the Tear, access the item menu by right-clicking on it. You will see this:
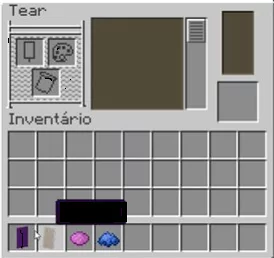
The 3 slots in the top left corner of the menu are for you to place, respectively, Banner, Dye, and Design for Banner. Once you complete dragging these items onto the Loom, you will have access to several different textures and decorations.
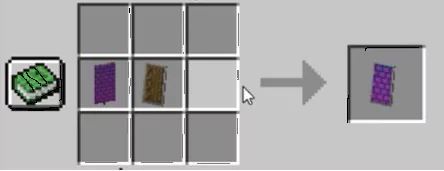
You don’t need to use the 3 slots, as long as you place a Banner + Dye or Standard Design, you will already have decoration options. The result of these combinations will be a Banner with the chosen texture, as in the image above. Finally, to decorate your shield, simply combine the customized Banner with the Shield on the normal Crafting Table.
Ready! This way you can customize your Shield in many (MANY) ways by combining textures, designs, and colors.
Shield Information
- Even though they have Iron in their components, shields cannot be fused.
- When a Shield absorbs damage of 4 or greater, the item takes damage equal to the attack value -1.
- The knockback caused by explosions is reduced by 1 block when the player uses a Shield.
- Shields do not protect the user from splash potion effects.